

Supply and Demand EA is a free download for MetaTrader 4 (MT4) that trades supply and demand zones on forex pairs such as EURUSD and USDJPY, and on metals, indices and CFDs. It is semi-automatic. It finds the zones and places the trades, but the direction is always yours. For this 2026 update we ran it on a Tickmill demo account and went through every input and panel control. It can’t be backtested, so this review covers how it works rather than profit figures.
TL;DR – Semi-automatic MT4 EA that trades supply and demand zones in the direction you set. Every automatic trade gets a stop and a target sized from the zone, with one EA trade per symbol by default and no grid or martingale. It has no trend filter and cannot be backtested, so you learn it on demo.
What is the Supply and Demand EA?
The Supply and Demand EA is a semi-automatic MetaTrader 4 robot that marks supply and demand zones on your chart and opens a trade when price returns to one. You set the direction, the timeframes and the zone sizes on its panel, and each automatic trade gets a stop loss and a take profit sized from the zone’s height.
How the Supply and Demand EA Works
A supply zone is a price area where selling once pushed price down hard. A demand zone is the same thing on the buy side. The idea behind supply and demand trading is that unfilled orders often sit in those areas, so price tends to react when it returns. It is the same reasoning behind order block trading and much of classic price action analysis. The EA draws supply zones in red and demand zones in blue.
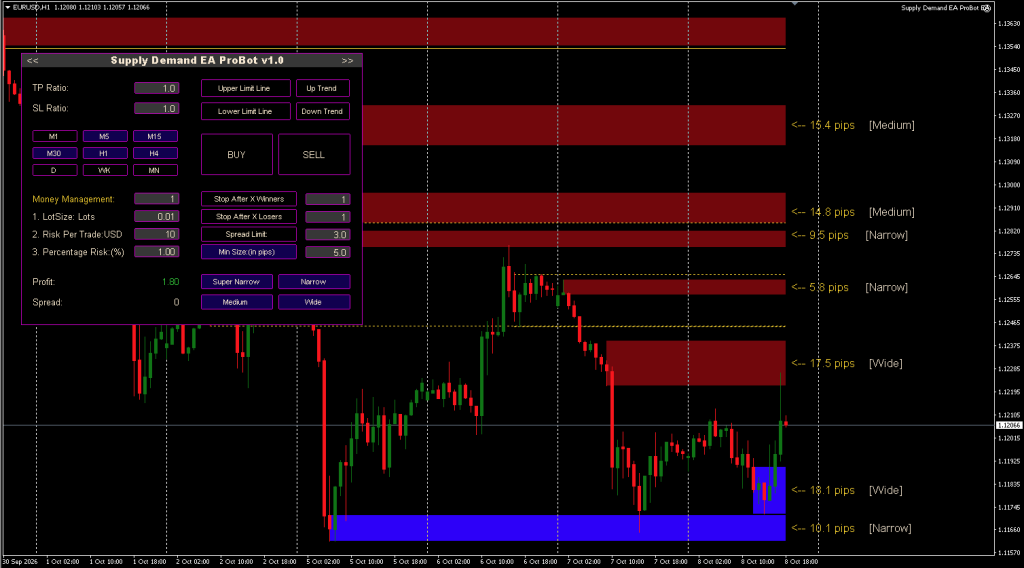
- Zone labels – Each zone on the current chart gets a label with its height in pips and a size class: SuperNarrow, Narrow, Medium or Wide.
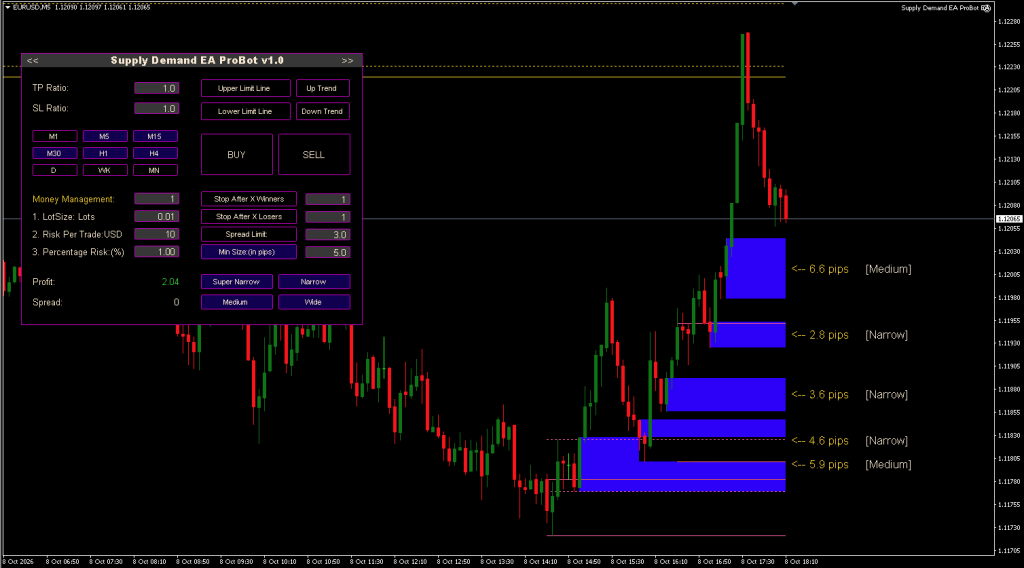
- Size class is relative – The class compares a zone with the rest of the chart, not with a fixed number of pips. On our EURUSD M5 chart a 6.6-pip zone is Medium, while on H1 a 10.1-pip zone is only Narrow.
- Stop and target from the zone – With the TP and SL ratios at 1.0, a 10-pip zone gives a 10-pip target and a 10-pip stop loss. Set the ratios to 2 and 3 and the same zone gives a 20-pip target and a 30-pip stop. An input switches the measure from zone height to ATR (average true range, a measure of recent bar size).
Small zones are where the defaults bite. A 5-pip target on EURUSD pays the spread plus commission on every trade, which on a raw-spread account can come to almost 1 pip, close to a fifth of the target. On the M5 chart below, three of the five demand zones are under 5 pips. The Min Size filter (5 pips on our panel) is what keeps the EA off them, so raise it on any pair or account where costs are higher.
Higher-timeframe zones on one chart
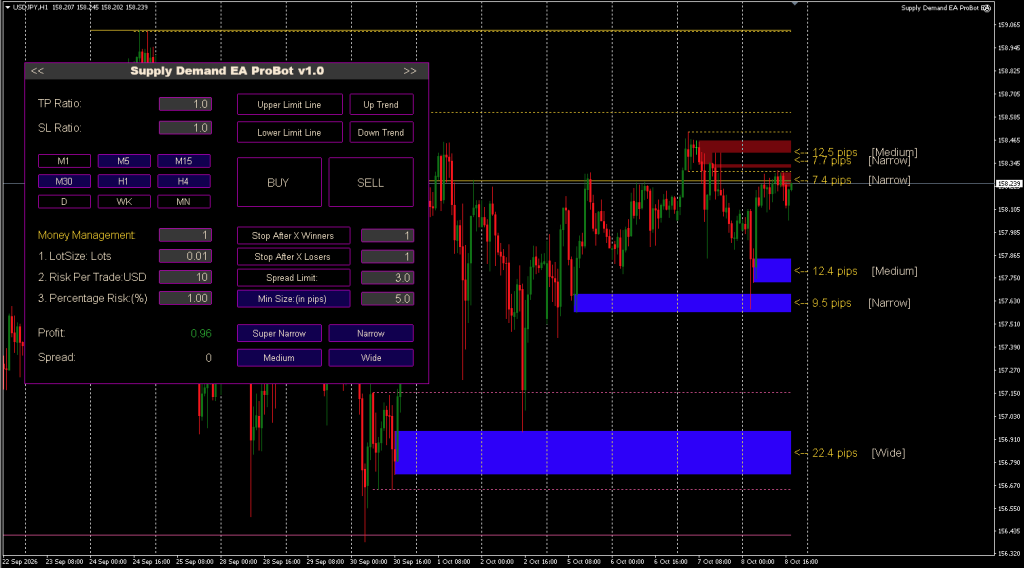
The EA also draws zones from the timeframes above the chart. Dotted lines mark zones from the first timeframe up and solid lines from the second, so an H1 chart shows H4 and daily zones. It is the quickest way to see whether a small H1 zone sits inside a bigger daily one, and that context is what you need when picking the direction.
Please test in a demo account for at least a week first. Then, please familiarize yourself with and understand how Supply and Demand EA works, and only use it in a real account.
Supply and Demand EA Settings
The inputs window holds the account-wide limits and the display options. These are the defaults our copy loaded with, read from the MT4 Experts log.
| Input | Default | What it does |
|---|---|---|
| MaxTotalOrders | 10 | Most EA trades open at once across the whole account |
| MaxSymbolOrders | 1 | Most EA trades open at once on one symbol |
| CandlesBack | 150 | How far back, in candles, it looks for zones |
| TP_SL_Ratio | 1 (zone-based) | Whether the TP and SL ratios measure zone height or ATR |
| TrendStyle | 2 (channel) | Whether Up Trend and Down Trend draw a channel or a single trendline |
| Zone_Labels_Number | 5 | How many zones get a label on each side |
| manual_trading | false | Turns on click-to-trade from the zone labels |
| First_MTF / Second_MTF / Third_MTF | true / true / false | Zone lines from one, two or three timeframes up |
| Max_Daily_Loss (dollars, %, trades) | off ($200, 10%, 3 trades) | Daily loss cap across all pairs |
| Max_Daily_Profit (dollars, %, trades) | off ($200, 10%, 3 trades) | Daily profit cap across all pairs |
| OpenTradesAlerts | true | Alert and phone notification when a trade opens or closes |
The daily loss cap counts the EA’s open and closed trades on every pair. When it is reached, the EA stops on that chart and closes that chart’s open trades. The profit cap only stops new trades. Both caps ship switched off, and turning the loss cap on is the first change we would make.
Recommendations for the Supply and Demand EA
- Minimum deposit – No official figure. $100 on demo is enough to learn the panel at 0.01 lots.
- Pairs and timeframes – Any symbol and timeframe works. Start with one major pair such as EURUSD and H1 zones, which are usually wide enough to clear the spread.
- Account – A low spread ECN account matters more than usual, because the target is only as big as the zone (Find the Perfect Broker For You Here).
- VPS – Semi-automatic mode only trades while MT4 is open, so it needs a VPS to run around the clock (Reliable and Trusted FOREX VPS – FXVM). Manual mode doesn’t.
- News – There is no news filter among its inputs. Switch BUY and SELL off before high-impact releases, or set the timer to skip them.
Manual or Semi-Automatic: Who Decides the Trade?
The EA has two ways of working, and in both of them the direction comes from you. Our copy’s full input list, printed in the MT4 Experts log when it loaded, has no trend or direction setting at all.
| Mode | How to set it | What the EA does | Who picks the direction |
|---|---|---|---|
| Manual | manual_trading = true, BUY and SELL off | Nothing by itself. Clicking a zone label opens a market or limit order at that zone | You, trade by trade |
| Semi-auto, one side | BUY on or SELL on | Buys every demand-zone touch, or sells every supply-zone touch, on the lit timeframes | You, for as long as the button stays on |
| Semi-auto, both sides | BUY and SELL on | Buys at demand zones and sells at supply zones | Nobody. It trades both sides |
A common way to run it is to read the bias on the 4-hour and daily charts for day trading, or on the weekly and monthly for swing trading, then switch on only the matching side. Price channels help here, and our channels and support and resistance lesson covers how to draw them.
Switching both buttons on is the risky setting. In a falling market the EA buys at every demand zone that price falls into, and each of those is a trade against the trend. If you want a robot that makes the direction call itself, the fully automatic Supply Demand EA we covered in 2023 is a different EA built that way.
The Trading Panel, Button by Button
Every trading decision lives on the panel, not in the inputs window.
- TP Ratio and SL Ratio – Target and stop as multiples of the zone height.
- Timeframe buttons (M1 to MN) – The timeframes whose zones the EA may trade, all from the one chart it is attached to.
- BUY and SELL – The trade direction.
- Money Management 1, 2 or 3 – Mode 1 trades a fixed lot, mode 2 risks a set dollar amount per trade, and mode 3 risks a percentage of the account, each with its own value box. Our lot size optimizer shows what those amounts mean for your stop size.
- Stop After X Winners and Stop After X Losers – The EA stops after that many winning or losing trades. Click the button off and on again to restart it.
- Spread Limit – No new trades while the spread is above this many pips.
- Min Size (in pips) – Skips zones smaller than this.
- SuperNarrow, Narrow, Medium and Wide – Which zone classes it may trade.
- Upper Limit Line and Lower Limit Line – Each drops a line you drag into place. The EA trades only zones below the upper line and above the lower one, so the two together fence off a price range.
- Up Trend and Down Trend – Draws a channel or trendline you can reshape. Only zones inside it are traded, and the direction switches to BUY for an up channel or SELL for a down one. The channel stays where you put it and does not move with new candles.
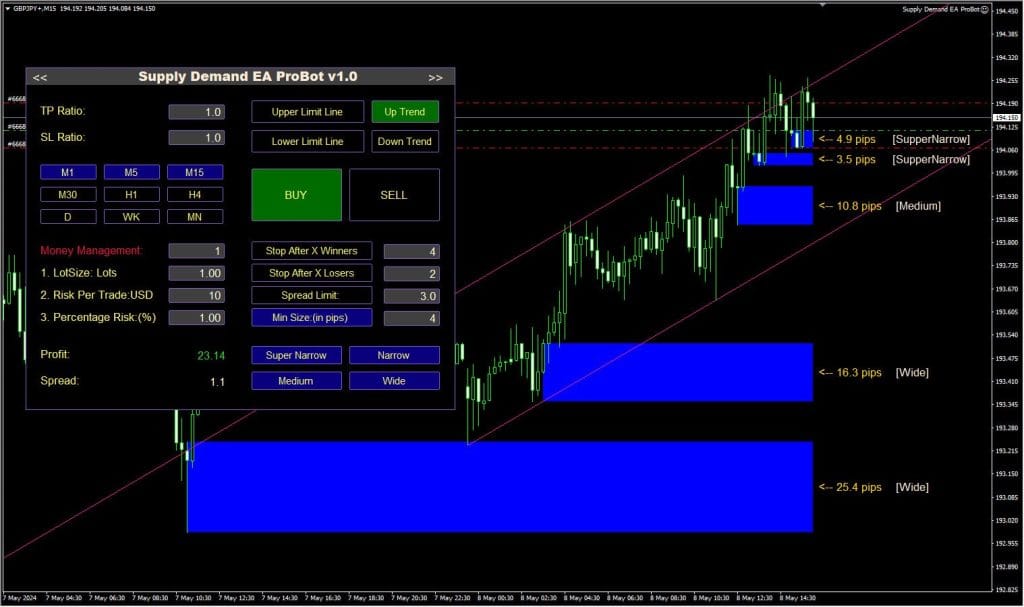
One catch: with a channel or trendline on the chart, the EA switches off every timeframe above the chart’s own. Draw the channel on the highest timeframe you want to trade.
The extension panel
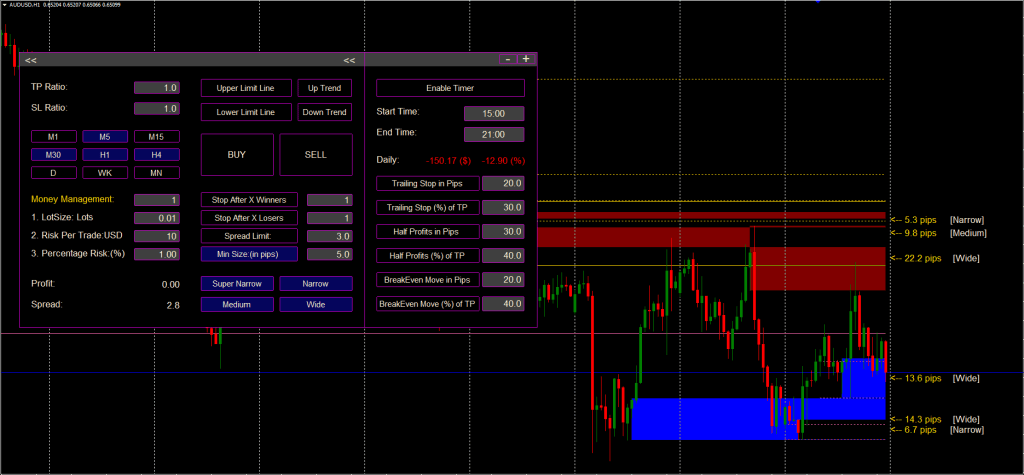
The >> arrow at the top right of the panel opens a second panel with trade management and a session timer.
- Enable Timer – Trades only between a start and an end time, read from your computer’s or VPS’s clock rather than broker server time. Check both against our forex market hours guide.
- Trailing stop in pips or as a % of TP – Set 20 pips and the trailing stop starts once a trade is 20 pips up, then follows 20 pips behind price. A reader running it on a live account reported in our comments that the take profit is removed once the trail starts, so trades that would have reached the target were closed by the trail for less. Leave the trail off if you want the zone target to stay in place.
- Half profits in pips or as a % of TP – Closes half the position at that level. A 0.01-lot trade can’t be split, so this needs at least 0.02 lots.
- Breakeven in pips or as a % of TP – Moves the stop to the entry price at that level.
Supply and Demand EA
A semi-automatic MT4 expert advisor that draws supply and demand zones from the chart and up to three higher timeframes, then trades zone touches in the direction you pick on its panel. One-click manual orders from the zone labels are also available.
Pros
- Draws and labels zones with their height in pips and a size class, plus zones from two higher timeframes, all on one chart
- Every automatic trade carries a stop loss and take profit set from the zone height, and only one EA trade runs per symbol by default
- Daily profit and loss caps in dollars, percent or trade count, plus stop-after-X-winners and stop-after-X-losers buttons
- Limit lines and trend channels you draw keep it trading only inside the price area you choose
Cons
- It has no trend filter, and with both BUY and SELL switched on it trades every zone touch in both directions
- It cannot be backtested, so the only way to judge a setting is weeks on a demo account
- The default 1:1 target and stop leave little room on small zones once spread and commission are paid
- No news filter and no preset files, and readers report the trailing stop removes the take profit once it starts
Summary
It does the mechanical part of zone trading well: finding zones, filtering them by size, placing each order with a stop and target, and halting after a set number of losses. It does not decide the market direction, and it cannot be backtested, so it is only as good as the bias and settings you give it.
 Built by ForexCrackedWe tested 1,200+ indicators. Then we built our own.Six years of reviewing EAs and indicators went into FXC Fusion: two engines, the seven-panel cockpit, MT4 and MT5, from the team behind this site.
Can You Backtest the Supply and Demand EA?
No, not in a way that means anything. Its direction comes from the BUY and SELL buttons on the panel, and the MT4 Strategy Tester does not pass button clicks to an EA. Whatever it does in a backtest is not driven by the choices you would make live. That also explains a report in our comments from a reader who saw it trade in the tester but not on a live account: on a live chart it does nothing until BUY or SELL is lit.
Any equity curve for this EA records one trader’s direction calls and panel settings, and two people running the same file on the same pair can get opposite results. The Strategy Tester guide still applies to most robots on this site, but this one needs a forward test on demo:
- One direction at a time – Switch on BUY or SELL, never both, and note the higher-timeframe reason for the choice.
- Fixed lots, frozen settings – Use mode 1 at 0.01 lots and keep the ratios, zone classes and timeframes unchanged, so the results describe one setup.
- Hard limits on – Stop After X Losers at 3 and the daily loss cap on.
- Enough trades – Give it two to four weeks, or at least 30 trades, before comparing it with another setting.
Frequently Asked Questions (FAQ)
Conclusion
The Supply and Demand EA works best as an execution tool for traders who already mark zones by hand. Its zone mapping is the strongest part, and it puts a stop and a target on every trade it places. However, the result rests on the direction you choose, and with no backtest the only proof a setting gets is time on demo. Start with one pair, one direction, Min Size above your costs and the loss cap on, and judge it after a month rather than a week.


Discussion 11 comments
Is this still working?
A real shame hoping it would work.Not working invalid license.
Be nice to try the latest version if possible?
Hi is it possible to have the source code of the version 1,0 ?
Maybe u mean 1.10 ya admin plz update it to v1.10 or 1.19 that enable news filter and other features
Hi Administrator,
can you add the last 1.10 version that introduces a lot of features? Thanks
Todo funciona correctamente, gran EA, haciendo aún ajustes en los TF y zonas, para evitar caiga en falsos, lo ando probando directamente en real, ya que veo marca zonas buenas; lo único malo que observo, es que cuando activa el trailing stop, quita el TP, lo cual ha evitado que el BOT hubiese alcanzado varios TP ya, y pues se ha regresado a stop profit (menos ganancias), pero para esto, pondré mi bot gestor de trailing, a ver si lo deja..
Gracias Administrador.
Its taking trades in the Strategy Tester but not in Real Account.
Can you try to arrange the latest version of the software 1.6?
This ea by far the best in EA world. Entry is taken always on retest levels
not work 🙁
Thanks admin looks good
Is this a indicator only not EA